
Installation Guide to Rainwater Guttering Systems

As part of our continued product development initiatives we are constantly introducing new products and updating our existing ranges, hence our rainwater range is better than ever!
Incorporating various different systems to cover all installations from domestic to commercial and industrial. These systems provide a variety of profiles and
capacities ensuring that every installation is catered for whether it is a modern streamline dwelling or an industrial property.
A comprehensive range of fittings to provide the specifier and installer with a complete drainage solution accompanies each rainwater profile.
All rainwater products are manufactured from PVCu in accordance with a Quality Management System to BS EN ISO 9002 (certificate no FM00318)
- Half Round Guttering
- Round Guttering
- Square Guttering
- Klassic Ogee Guttering
- Klassic Deepflow Guttering
- Kast Iron Effect Guttering
- Floplast Guttering
Gutter Sizing
The aim of designing a rainwater system is normally to achieve a balance between the cost of the system and the frequency and consequence of possible flooding. The capacity of the gutter should be designed to provide adequate disposal of the heavy rainfall usually associated with thunderstorms.
A simple methodology for roof drainage design is shown below but for further information regarding roof drainage refer to BS6367:1983 “Code of practice for the drainage of roofs and paved areas”.
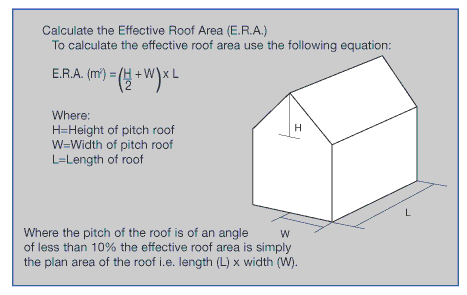
Determine Gutter Layout
To determine the profile of the gutter required it is now necessary to define three criteria,
-
How many outlets are on the gutter?
- What positions these outlets are in?
The number and position of outlets is usually determined by the number of gullies / hoppers shown on the drainage layout.
-
What fall is the gutter to be installed at?
Once the above criteria have been satisfied the size and/or profile of gutter to be used can be selected.
Gutter Selection
Due to the infrequency of extremely heavy rainfall in the United Kingdom, it is almost impossible to design a cost efficient rainwater system to give complete immunity from flooding and overflow.
Because of this it is generally regarded as normal practice to design rainwater systems using a rainwater intensity level of 75mm per hour. To calculate the gutter requirement, multiply the E.R.A (m2) by a factor of 0.0208 (75mm/hour divided by
3600 seconds/hour) to give the flow rate in litres/second (l/s).
Note: If a gutter angle is introduced into the rainwater gutter run, the effective gutter capacity will be affected and an adjustment must be made to the maximum roof area which each rainwater system is capable of draining (see Code of Practice BS EN 12056-3:2000 for further details).

The choice of a rainwater system often comes down to two decisions; domestic/commercial and aesthetics. Half round and square systems are generally used for domestic properties although Ogee can provide a more aesthetically pleasing look.
Handling and Storage
Although rainwater gutter, downpipe and the associated fittings are strong and lightweight, care must be taken when handling.
Extra precaution should be taken in cold conditions due to the reduction in impact strength of plastic products.
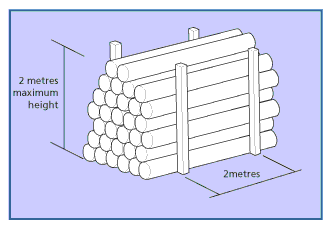
All gutter and downpipe extrusions should be stored away from direct sunlight and preferably under cover. When stored in any form of racking all extrusions should be supported at no more than two metre intervals.
Fittings should be kept under cover in their respective packaging until such time as required for installation.
Solvent cement should also be kept out of direct sunlight or away from any other heat source.
Jointing Brackets and Supports
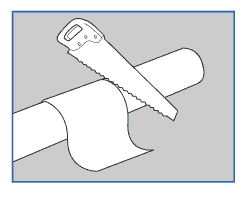
1. Preparing gutters & pipes
All rainwater gutters and pipes must be squarely cut and all burrs must be removed. It is recommended that a fine toothed handsaw is used. Care must be taken when cutting gutters and pipes in cold or damp conditions due to the slippery nature of the pipe surface.
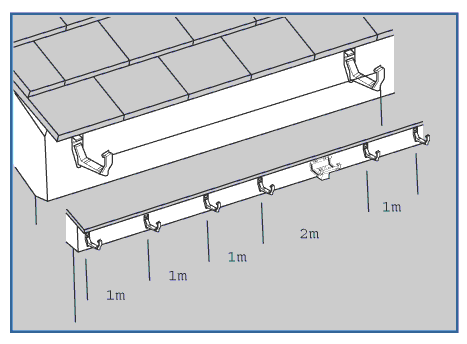
2. Gutter position
All gutters should be installed as high as possible and be positioned so that the edge of the roof is central to the cross section of the profile.
Although the performance of our gutter profiles enables them to be installed level, it is recommended that a fall of 1:600 is achieved. Supporting in the recommended spaces will reduce any sort of ponding, sagging or silting.
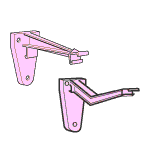
3. Brackets and supports
All systems feature a standard pvcu fascia bracket as well as top and side rafter brackets and rise and fall brackets. Also included in the range are top and side rafter arms for use with gutter fascia brackets and gutter unions and running outlets.
As part of the Ogee range, there is a top hung bracket which provides further enhancement of the gutter profile whilst giving support which is virtually invisible from ground level.
All supports should be fixed at centres not exceeding, as well as adjacent to both ends of any gutter angles. It is recommended that the bracket furthest away from the downpipe outlet is installed first. This means that if a fall is applied to the gutter this will be the highest bracket installed, therefore the correct gutter height will be determined immediately as installation commences.
Fascia Brackets
All TSO's gutter fascia brackets incorporate three screw holes and it is recommended that all three are utilised in order to counter the effects of heavy snow fall or high winds. It is also recommended that support centres are reduced in situations where such heavy snow fall or high winds are common.
All components should be secured to the fascia using corrosion resistant screws.
Normally traditional techniques are used when installing fascia brackets i.e. using a plumb line along the length of the fascia board and fixing brackets at intervals.
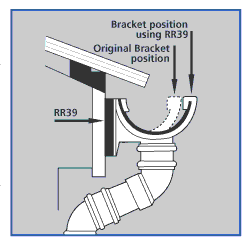
If there is excessive overhang from the roof tiles then it is possible to use a spacer plate (RR39) to bring the gutter forward by 15mm. This may prevent the need for a wider profile gutter. In this instance spacer plates should be used behind all fascia brackets, unions and outlets.
Necessary space must be left between support brackets for any unions or outlets. Unions and outlets must be secured to the fascia utilising the screw holes provided on each fitting.
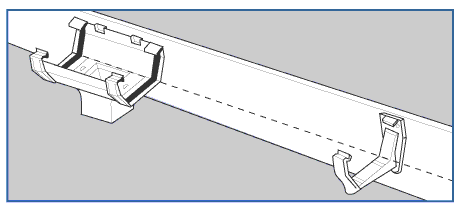
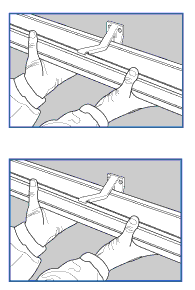
Once all brackets, unions and outlets are in place the gutter can then be clipped into place.
All of our rainwater systems use a flexible clipping band to secure the gutter profile providing a sound watertight joint. There is no need to remove the clipping band to complete the installation. The gutter is simply offered into the bracket, union or outlet with the side nearest the fascia being introduced first. Then by applying a little downward pressure to the gutter the clipping band is pushed over the top edge of the gutter.
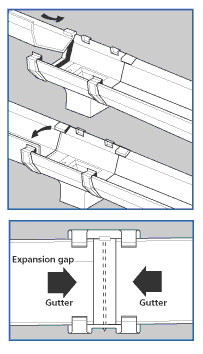
On all gutter joints an expansion gap must be allowed to ensure that any thermal movement is accommodated between two fixed gutter fittings.
Insertion depths are marked on all Jointing fittings, such that, if the gutter ends are fitted to the “insert to here” lines there will be ample provision for expansion and contraction under normal UK conditions.
It is recommended that external stop ends should only be used where the gutter length from the running outlet does not exceed 300mm.
Where gutter lengths exceed 300mm, a fixed union bracket and an internal stop
end should be used to ensure that expansion and contraction is controlled.
Top Hanging Brackets
In addition to the standard fascia bracket the Ogee range also incorporates two top hung brackets, one being for standard installations, the other being an angled bracket for use with conservatories. The method of fixing the brackets to the fascia is exactly the same as the standard fascia bracket.
Rafter Brackets
In addition to the range of fascia brackets, we offer a range of rafter brackets.
Rafter brackets can be used where there is no fascia board in place to fix a bracket to.
They are screwed to the rafters either before the roof is fixed in place (top rafter bracket) or after the roof is completed (side rafter bracket). Side rafter brackets are ideal for maintenance work as they can be installed with the roof in place.
Standard Rafter Brackets only fit around the gutter, not fittings. It is necessary to use the Universal Rafter Brackets to connect Unions and Running Outlets.
Should a gradient be required in the gutter run then rise and fall brackets can be used as an alternative to the rafter brackets where there is no fascia board in place.

If the installer wishes they can also use the universal rafter arm in combination with a standard fascia bracket to include a fall. These are available in top and side variations and allow for up to 65mm height adjustment.
Standard Rafter Brackets only fit around guttering, not fittings. It is necessary to use the Universal Rafter Brackets to connect Unions and Running Outlets.
When using rafter type brackets all gutter joints must be made using gutter union brackets / universal rafter brackets or, alternatively, supports should also be fixed either side of each fitting in any gutter run.
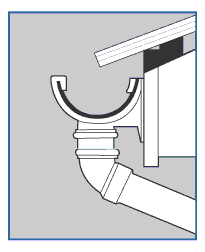
Downpipe Installation
It is recommended that all downpipes are solvent welded to the running outlets prevent any dropping of downpipes due to the thermal expansion of the plastic pipe system, 10mm expansion gaps must be left between the end of the downpipe and the bottom of the sockets of all other fittings in the downpipe run.
As with gutter runs all downpipe runs must be securely supported.
All offsets, connectors, shoes and access pipes should be securely supported.
Outlets and Offsets
All our downpipes will connect directly on to the spigot of a running outlet.
Due to building design it is usually not possible to connect a downpipe to the outlet and continue this to the drain connection without any joints, an offset is often required at the gutter outlet.
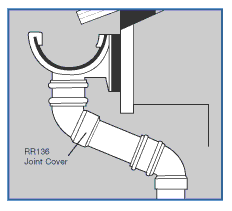
All offsets at roof line level are achieved by using the offset bends detailed in the product guide.
5mm square and 68mm circular are available in both 92.5† and 112.5†. 50mm is available in 112.5† angle only. To give the offset joints a clean look the RR 136 joint cover is available for the 68mm round downpipe system.
All offsets should be supported directly beneath the lower offset bend by a pipe bracket or clip or in the case of 68mm square downpipes the RS233 / RS234 pipe fittings combine a pipe connector with a bracket to give a secure fixing.
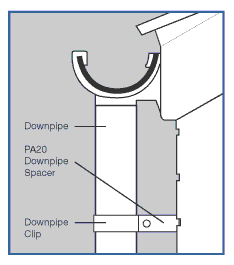
Should there be a case where the downpipe needs to stand off the wall slightly, i.e. offset decorative brickwork or tudor style beams, then a downpipe spacer (PA20) can be used to give an extra 30mm clearance between the downpipe and the wall.
For connections to drains including rainwater shoes and adaptors see Connections to Drainage Systems section.
Connection to other Materials
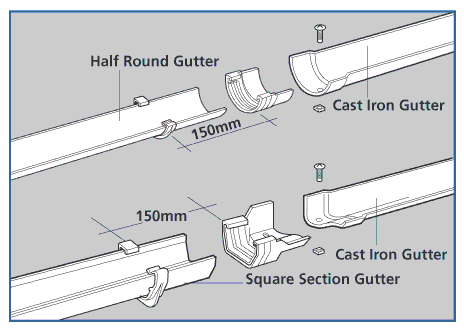
As part of the half round, square and ogee ranges, we supply a range of gutter adaptors to connect to existing metal profiles. These include connections to half round, square and both left and right hand ogee profiles.
Connection to the metal gutter is made by installing a bolt through both the adaptor and the metal gutter section and sealing the joint with an appropriate waterproof mastic.
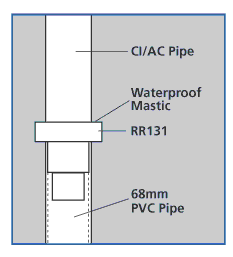
All adaptors must be supported at either side of the connection.
